Match Overview
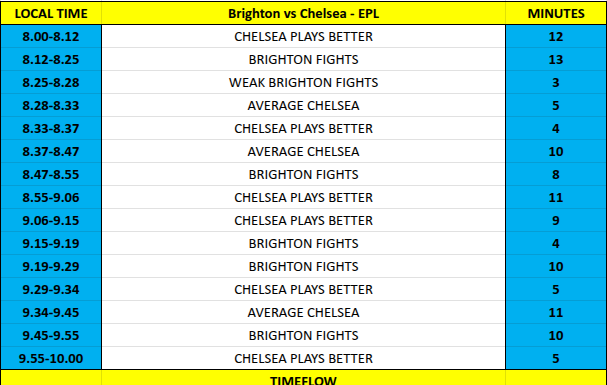
The clash between Brighton and Chelsea FC shows a highly dynamic time-flow where momentum keeps shifting throughout the match. Instead of one-sided dominance, the pattern suggests phases of control, resistance, and balance.
First Phase (8:00 – 8:25)
The match begins with Chelsea showing early control, holding a stronger phase from 8:00 to 8:12. However, Brighton responds quickly with a fighting phase between 8:12 and 8:25.
Insight:
- Early pressure from Chelsea
- Brighton does not stay passive and reacts well
Second Phase (8:25 – 8:47)
This period becomes slightly unstable. Brighton shows weak resistance briefly, followed by an average Chelsea phase, and then Chelsea again builds control from 8:33 to 8:37.
Insight:
- Chelsea tries to stabilize control
- Brighton struggles briefly but stays competitive
Third Phase (8:47 – 9:15)
Momentum shifts again as Brighton enters a strong fighting phase from 8:47 to 8:55. But Chelsea regains control quickly with back-to-back dominant phases from 8:55 to 9:15.
Insight:
- One of the most important swings
- Chelsea builds consistency here
Fourth Phase (9:15 – 9:45)
This is a mixed phase. Brighton fights in short bursts, while Chelsea Fc alternates between control and average phases. Neither side fully dominates this segment.
Insight:
- Balanced gameplay
- Frequent momentum shifts
Final Phase (9:45 – 10:00)
The closing minutes show Brighton pushing again, but Chelsea ends with another controlled phase.
Insight:
- Brighton attempts late impact
- Chelsea maintains composure in the final stretch
Overall Time Flow Pattern
- Chelsea Advantage Phases: More frequent and slightly longer
- Brighton Fighting Phases: Sharp and reactive
- Neutral Phases: Present, showing match balance
Final Prediction Insight (No Winner)
This match is not one-sided. The time-flow clearly indicates:
- Chelsea may have structured control phases
- Brighton shows strong resistance and comeback ability
- Momentum shifts make the match unpredictable